10.桥接模式
桥接模式是一种结构型设计模式,它的UML图很像一座桥,它通过将【抽象部分】与【实现部分】分离,使它们可以独立变化,从而达到降低系统耦合度的目的。
需求
【设计模式专题之桥接模式】10-万能遥控器
**题目描述
- 小明家有一个万能遥控器,能够支持多个品牌的电视。每个电视可以执行开机、关机和切换频道的操作,请你使用桥接模式模拟这个操作。
**输入描述
- 第一行是一个整数 N(1 <= N <= 100),表示后面有 N 行输入。
- 接下来的 N 行,每行包含两个数字。第一个数字表示创建某个品牌的遥控和电视,第二个数字表示执行的操作。
- 其中,0 表示创建 Sony 品牌的电视,1 表示创建 TCL 品牌的遥控和电视;
- 2 表示开启电视、3表示关闭电视,4表示切换频道。
输入示例
6
0 2
1 2
0 4
0 3
1 4
1 3
输出示例
Sony TV is ON
TCL TV is ON
Switching Sony TV channel
Sony TV is OFF
Switching TCL TV channel
TCL TV is OFF
基本概念
桥接模式(Bridge Pattern)是一种结构型设计模式,它的UML图很像一座桥,它通过将【抽象部分】与【实现部分】分离,使它们可以独立变化,从而达到降低系统耦合度的目的。桥接模式的主要目的是通过组合建立两个类之间的联系,而不是继承的方式。
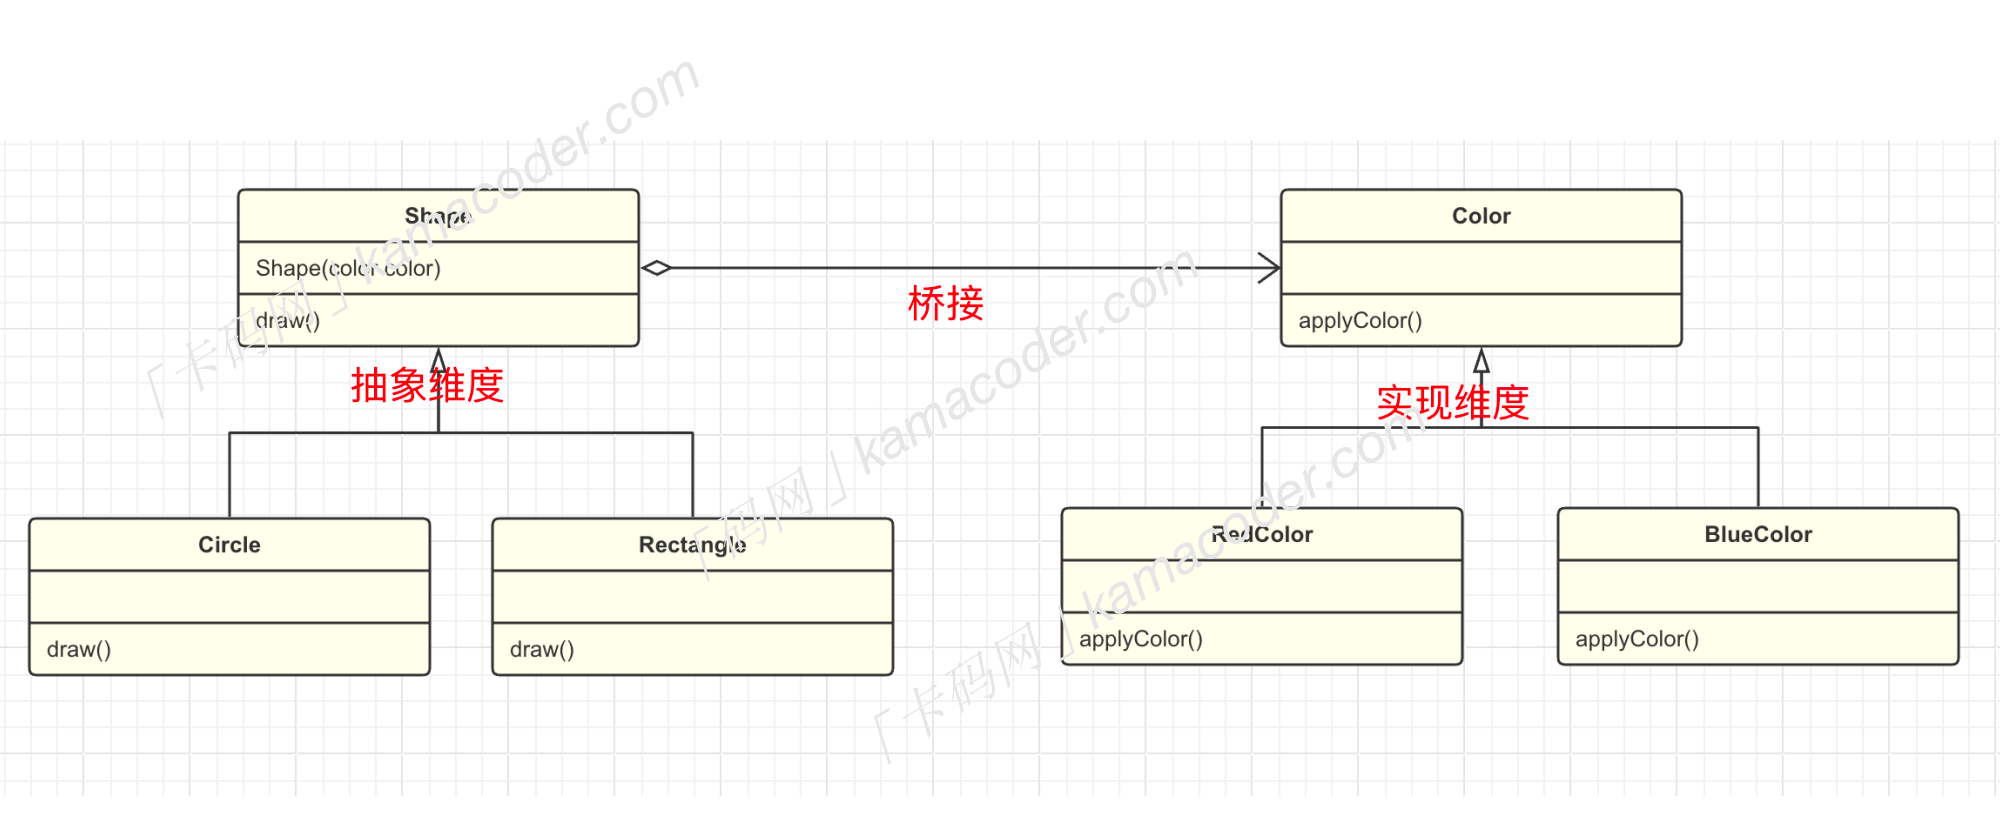
举个简单的例子,图形编辑器中,每一种图形都需要蓝色、红色、黄色不同的颜色,如果不使用桥接模式,可能需要为每一种图形类型和每一种颜色都创建一个具体的子类,而使用桥接模式可以将图形和颜色两个维度分离,两个维度都可以独立进行变化和扩展,如果要新增其他颜色,只需添加新的 Color 子类,不影响图形类;反之亦然。

基本结构
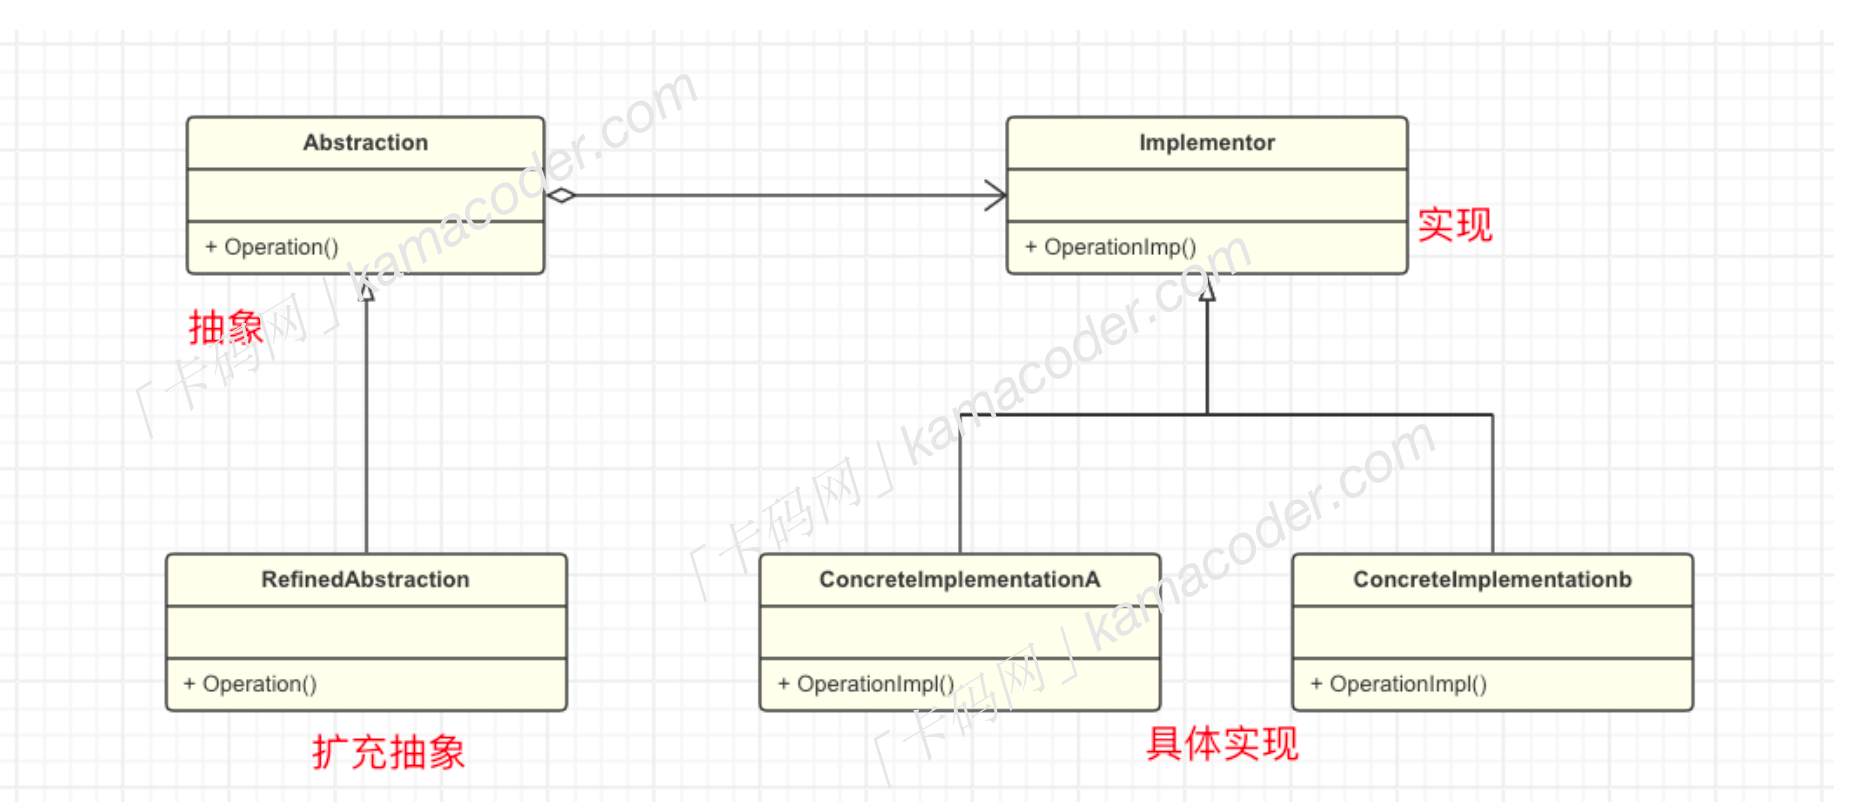
桥接模式的基本结构分为以下几个角色:
- 抽象
Abstraction:一般是抽象类,定义抽象部分的接口,维护一个对【实现】的引用。 - 修正抽象
RefinedAbstaction:对抽象接口进行扩展,通常对抽象化的不同维度进行变化或定制。 - 实现
Implementor: 定义实现部分的接口,提供具体的实现。这个接口通常是抽象化接口的实现。 - 具体实现
ConcreteImplementor:实现实现化接口的具体类。这些类负责实现实现化接口定义的具体操作。

再举个例子,遥控器就是抽象接口,它具有开关电视的功能,修正抽象就是遥控器的实例,对遥控器的功能进行实现和扩展,而电视就是实现接口,具体品牌的电视机是具体实现,遥控器中包含一个对电视接口的引用,通过这种方式,遥控器和电视的实现被分离,我们可以创建多个遥控器,每个遥控器控制一个品牌的电视机,它们之间独立操作,不受电视品牌的影响,可以独立变化。
简易实现
下面是实现桥接模式的基本步骤:
- 创建实现接口
interface Implementation {
    void operationImpl();
}
以电视举例, 具有开关和切换频道的功能。
interface TV {
    void on();
    void off();
    void tuneChannel();
}
- 创建具体实现类:实际提供服务的对象。
class ConcreteImplementationA implements Implementation {
    @Override
    public void operationImpl() {
        // 具体实现A
    }
}
class ConcreteImplementationB implements Implementation {
    @Override
    public void operationImpl() {
        // 具体实现B
    }
}
以电视举例,创建具体实现类
class ATV implements TV {
    @Override
    public void on() {
        System.out.println("A TV is ON");
    }

    @Override
    public void off() {
        System.out.println("A TV is OFF");
    }

    @Override
    public void tuneChannel() {
        System.out.println("Tuning A TV channel");
    }
}

class BTV implements TV {
    @Override
    public void on() {
        System.out.println("B TV is ON");
    }

    @Override
    public void off() {
        System.out.println("B TV is OFF");
    }

    @Override
    public void tuneChannel() {
        System.out.println("Tuning B TV channel");
    }
}
- 创建抽象接口:包含一个对实现化接口的引用。
public abstract class Abstraction {

    protected IImplementor mImplementor;

    public Abstraction(IImplementor implementor) {
        this.mImplementor = implementor;
    }

    public void operation() {
        this.mImplementor.operationImpl();
    }

}
abstract class RemoteControl {
    // 持有一个实现化接口的引用
    protected TV tv;

    public RemoteControl(TV tv) {
        this.tv = tv;
    }

    abstract void turnOn();
    abstract void turnOff();
    abstract void changeChannel();
}
- 实现抽象接口,创建
RefinedAbstaction类
class RefinedAbstraction implements Abstraction {
    private Implementation implementation;

    public RefinedAbstraction(Implementation implementation) {
        this.implementation = implementation;
    }

    @Override
    public void operation() {
        // 委托给实现部分的具体类
        implementation.operationImpl();
    }
}
class BasicRemoteControl extends RemoteControl {
    public BasicRemoteControl(TV tv) {
        super(tv);
    }

    @Override
    void turnOn() {
        tv.on();
    }

    @Override
    void turnOff() {
        tv.off();
    }

    @Override
    void changeChannel() {
        tv.tuneChannel();
    }
}
- 客户端使用
// 客户端代码
public class Main {
    public static void main(String[] args) {
        // 创建具体实现化对象
        Implementation implementationA = new ConcreteImplementationA();
        Implementation implementationB = new ConcreteImplementationB();

        // 使用扩充抽象化对象,将实现化对象传递进去
        Abstraction abstractionA = new RefinedAbstraction(implementationA);
        Abstraction abstractionB = new RefinedAbstraction(implementationB);

        // 调用抽象化的操作
        abstractionA.operation();
        abstractionB.operation();
    }
}
public class Main {
    public static void main(String[] args) {
        TV aTV = new ATV();
        TV bTV = new BTV();

        RemoteControl basicRemoteForA = new BasicRemoteControl(aTV);
        RemoteControl basicRemoteForB = new BasicRemoteControl(bTV);

        basicRemoteForA.turnOn();  // A TV is ON
        basicRemoteForA.changeChannel();  // Tuning A TV channel
        basicRemoteForA.turnOff();  // A TV is OFF

        basicRemoteForB.turnOn();  // B TV is ON
        basicRemoteForB.changeChannel();  // Tuning B TV channel
        basicRemoteForB.turnOff();  // B TV is OFF
    }
}
使用场景
桥接模式在日常开发中使用的并不是特别多,通常在以下情况下使用:
-
当一个类存在两个独立变化的维度,而且这两个维度都需要进行扩展时,使用桥接模式可以使它们独立变化,减少耦合。
-
不希望使用继承,或继承导致类爆炸性增长
总体而言,桥接模式适用于那些有多个独立变化维度、需要灵活扩展的系统。
本题代码
import java.util.Scanner;

// 步骤1: 创建实现化接口
interface TV {
    void turnOn();
    void turnOff();
    void switchChannel();
}

// 步骤2: 创建具体实现化类
class SonyTV implements TV {
    @Override
    public void turnOn() {
        System.out.println("Sony TV is ON");
    }

    @Override
    public void turnOff() {
        System.out.println("Sony TV is OFF");
    }

    @Override
    public void switchChannel() {
        System.out.println("Switching Sony TV channel");
    }
}

class TCLTV implements TV {
    @Override
    public void turnOn() {
        System.out.println("TCL TV is ON");
    }

    @Override
    public void turnOff() {
        System.out.println("TCL TV is OFF");
    }

    @Override
    public void switchChannel() {
        System.out.println("Switching TCL TV channel");
    }
}

// 步骤3: 创建抽象化接口
abstract class RemoteControl {
    protected TV tv;

    public RemoteControl(TV tv) {
        this.tv = tv;
    }

    abstract void performOperation();
}

// 步骤4: 创建扩充抽象化类
class PowerOperation extends RemoteControl {
    public PowerOperation(TV tv) {
        super(tv);
    }

    @Override
    void performOperation() {
        tv.turnOn();
    }
}

class OffOperation extends RemoteControl {
    public OffOperation(TV tv) {
        super(tv);
    }

    @Override
    void performOperation() {
        tv.turnOff();
    }
}

class ChannelSwitchOperation extends RemoteControl {
    public ChannelSwitchOperation(TV tv) {
        super(tv);
    }

    @Override
    void performOperation() {
        tv.switchChannel();
    }
}

// 步骤5: 客户端代码
public class Main {
    public static void main(String[] args) {
        Scanner scanner = new Scanner(System.in);

        int N = scanner.nextInt();
        scanner.nextLine();

        for (int i = 0; i < N; i++) {
            String[] input = scanner.nextLine().split(" ");
            int brand = Integer.parseInt(input[0]);
            int operation = Integer.parseInt(input[1]);

            TV tv;
            if (brand == 0) {
                tv = new SonyTV();
            } else {
                tv = new TCLTV();
            }

            RemoteControl remoteControl;
            if (operation == 2) {
                remoteControl = new PowerOperation(tv);
            } else if (operation == 3) {
                remoteControl = new OffOperation(tv);
            } else {
                remoteControl = new ChannelSwitchOperation(tv);
            }

            remoteControl.performOperation();
        }

        scanner.close();
    }
}
其他语言版本
C++
#include <iostream>
#include <sstream>
#include <vector>

// 步骤1: 创建实现化接口
class TV {
public:
    virtual void turnOn() = 0;
    virtual void turnOff() = 0;
    virtual void switchChannel() = 0;
};

// 步骤2: 创建具体实现化类
class SonyTV : public TV {
public:
    void turnOn() override {
        std::cout << "Sony TV is ON" << std::endl;
    }

    void turnOff() override {
        std::cout << "Sony TV is OFF" << std::endl;
    }

    void switchChannel() override {
        std::cout << "Switching Sony TV channel" << std::endl;
    }
};

class TCLTV : public TV {
public:
    void turnOn() override {
        std::cout << "TCL TV is ON" << std::endl;
    }

    void turnOff() override {
        std::cout << "TCL TV is OFF" << std::endl;
    }

    void switchChannel() override {
        std::cout << "Switching TCL TV channel" << std::endl;
    }
};

// 步骤3: 创建抽象化接口
class RemoteControl {
protected:
    TV* tv;

public:
    RemoteControl(TV* tv) : tv(tv) {}

    virtual void performOperation() = 0;
};

// 步骤4: 创建扩充抽象化类
class PowerOperation : public RemoteControl {
public:
    PowerOperation(TV* tv) : RemoteControl(tv) {}

    void performOperation() override {
        tv->turnOn();
    }
};

class OffOperation : public RemoteControl {
public:
    OffOperation(TV* tv) : RemoteControl(tv) {}

    void performOperation() override {
        tv->turnOff();
    }
};

class ChannelSwitchOperation : public RemoteControl {
public:
    ChannelSwitchOperation(TV* tv) : RemoteControl(tv) {}

    void performOperation() override {
        tv->switchChannel();
    }
};

// 步骤5: 客户端代码
int main() {
    int N;
    std::cin >> N;
    std::cin.ignore();

    for (int i = 0; i < N; i++) {
        std::string input;
        std::getline(std::cin, input);
        std::istringstream iss(input);

        int brand, operation;
        iss >> brand >> operation;

        TV* tv;
        if (brand == 0) {
            tv = new SonyTV();
        } else {
            tv = new TCLTV();
        }

        RemoteControl* remoteControl;
        if (operation == 2) {
            remoteControl = new PowerOperation(tv);
        } else if (operation == 3) {
            remoteControl = new OffOperation(tv);
        } else {
            remoteControl = new ChannelSwitchOperation(tv);
        }

        remoteControl->performOperation();

        delete tv;
        delete remoteControl;
    }

    return 0;
}
Python
# 步骤1: 创建实现化接口
class TV:
    def turn_on(self):
        pass

    def turn_off(self):
        pass

    def switch_channel(self):
        pass

# 步骤2: 创建具体实现化类
class SonyTV(TV):
    def turn_on(self):
        print("Sony TV is ON")

    def turn_off(self):
        print("Sony TV is OFF")

    def switch_channel(self):
        print("Switching Sony TV channel")

class TCLTV(TV):
    def turn_on(self):
        print("TCL TV is ON")

    def turn_off(self):
        print("TCL TV is OFF")

    def switch_channel(self):
        print("Switching TCL TV channel")

# 步骤3: 创建抽象化接口
class RemoteControl:
    def __init__(self, tv):
        self.tv = tv

    def perform_operation(self):
        pass

# 步骤4: 创建扩充抽象化类
class PowerOperation(RemoteControl):
    def perform_operation(self):
        self.tv.turn_on()

class OffOperation(RemoteControl):
    def perform_operation(self):
        self.tv.turn_off()

class ChannelSwitchOperation(RemoteControl):
    def perform_operation(self):
        self.tv.switch_channel()

# 步骤5: 客户端代码
if __name__ == "__main__":
    N = int(input())

    for _ in range(N):
        input_data = input().split(" ")
        brand = int(input_data[0])
        operation = int(input_data[1])

        if brand == 0:
            tv = SonyTV()
        else:
            tv = TCLTV()

        if operation == 2:
            remote_control = PowerOperation(tv)
        elif operation == 3:
            remote_control = OffOperation(tv)
        else:
            remote_control = ChannelSwitchOperation(tv)

        remote_control.perform_operation()
Go
package main

import "fmt"

// 步骤1: 创建实现化接口
type TV interface {
	TurnOn()
	TurnOff()
	SwitchChannel()
}

// 步骤2: 创建具体实现化类
type SonyTV struct{}

func (st *SonyTV) TurnOn() {
	fmt.Println("Sony TV is ON")
}

func (st *SonyTV) TurnOff() {
	fmt.Println("Sony TV is OFF")
}

func (st *SonyTV) SwitchChannel() {
	fmt.Println("Switching Sony TV channel")
}

type TCLTV struct{}

func (tt *TCLTV) TurnOn() {
	fmt.Println("TCL TV is ON")
}

func (tt *TCLTV) TurnOff() {
	fmt.Println("TCL TV is OFF")
}

func (tt *TCLTV) SwitchChannel() {
	fmt.Println("Switching TCL TV channel")
}

// 步骤3: 创建抽象化接口
type RemoteControl interface {
	PerformOperation()
}

// 步骤4: 创建扩充抽象化类
type PowerOperation struct {
	tv TV
}

func (po *PowerOperation) PerformOperation() {
	po.tv.TurnOn()
}

type OffOperation struct {
	tv TV
}

func (oo *OffOperation) PerformOperation() {
	oo.tv.TurnOff()
}

type ChannelSwitchOperation struct {
	tv TV
}

func (cso *ChannelSwitchOperation) PerformOperation() {
	cso.tv.SwitchChannel()
}

// 步骤5: 客户端代码
func main() {
	var N int
	fmt.Scan(&N)

	for i := 0; i < N; i++ {
		var brand, operation int
		fmt.Scan(&brand, &operation)

		var tv TV
		if brand == 0 {
			tv = &SonyTV{}
		} else {
			tv = &TCLTV{}
		}

		var remoteControl RemoteControl
		switch operation {
		case 2:
			remoteControl = &PowerOperation{tv: tv}
		case 3:
			remoteControl = &OffOperation{tv: tv}
		case 4:
			remoteControl = &ChannelSwitchOperation{tv: tv}
		}

		remoteControl.PerformOperation()
	}
}